Friday, September 18, 2015

#Makeup Trends | Best Liquid #Highlighters for #Strobing or Highlighting!!


Whether you want to call it 'highlighting' or 'Strobing', the trend to add a beautiful luminous glow to your skin is definitely not going away! Giorgio Armani has been iconic in reviving and creating this beautiful glow, which have been featured on the models of many of his fashion shows over the years. As with most fashion trends, the makeup styles and looks eventually trickle down to the masses. Now even faster than before with Social Media.

If you are looking to create the JLO Glow, adding highlight or want to be an expert on strobing, be sure to add these beautiful products, the amazing Giorgio Armani Fluid Sheers!

ABOUT FLUID SHEER

Fluid sheer is a beautiful skin illuminating product that offers radiance and glow. The formula is light weight, and easy to work with. It's available in over 10 flattering shades and can be used in multiple ways, a true multi-tasker!
  • Instantly adds glow and illuminates skin
  • Sheer, lightweight texture and coverage
  • Use it as an eye shadow base, blush or bronzer
  • Wear alone for glowing skin or tan enhancement
  • Mix into your favourite foundation to add glow and enhance tonality
  • Popular shades: #2, #10 and #11


SHADE DESCRIPTIONS

#2 Fluid Sheer: A light golden beige sheen. Excellent for spot highlighting/strobing effects on the cheeks and T Zone.

#10 Fluid Sheer: A medium golden bronze glow. Excellent for darker skin tones or adding a golden glow by mixing into your foundation.

#11 Fluid Sheer: A warm peachy shimmer. Excellent paired with blush and applied onto the cheeks.

These products are worth experimenting with since they leave a beautiful finish on the skin and offer multiple ways of using them! I also like that they leave a true sheen and not a sparkle, so it looks and glows like healthy skin. Be sure to check these shades out on your next Makeup Shopping trip!


Wednesday, September 16, 2015

Product Love | Maybelline Line Stiletto Ultimate Precision Liquid Liner


This week I shared 3 Liner looks using 3 specific liner products. As promised, I would be sharing my reviews on my fave liners at the moment. Maybelline has a series of products in their Stiletto collection from Mascaras to liners. Today I am reviewing Maybelline  Line Stiletto Ultimate Precision Liquid Liner.


Pros:
  • Great Colour - Black Ink
  • Flexible Felt Tip 
  • Dries Waterproof and lasts all day
  • Smudge proof
Cons:
  • Winged Edge may be tricky if you are used to a brush, but is achievable and looks amazing!

Overall:
This is a great Liquid liner, because it gives you a super black pigment, dries quickly and the line stays put. Maybelline has always made great liner products and this one gets my approval!


Here is a look I did using this product! It lasted the ENTIRE party! I will be sharing this fun look and more Bollywood inspired makeup looks in a few days so stay tuned!


Tuesday, September 15, 2015

What's in my #Makeup Kit? | My Top 5 Must-Haves


Over the years of being in the industry, I have built my Kit to include a number of amazing products from amazing brands. Out of all the products that are in my kit, there are a few key items that I will ALWAYS use and keep restocking them in my kit!

Check out the list below:

1. Ardell Lashes + Duo Lash Glue
2. MAC SkinFinish in By Candlelight or Soft & Gentle
3. Urban Decay Naked Palette
4. Giorgio Armani Fluid Sheers in #2, #10 & #11
5. 88 Original Coastal Scents Eyeshadow Palette

Ardell Lashes: There are tons of beautiful lash companies out there that are making stunning lashes. Ardell in my opinion, give tons of options for Natural, Full and Dramatic Lashes. I can pick and choose from a variety of Lashe styles that can work for any client. I also love that their price point is about $5 and you can get them from Walmart!! The Duo Glue is a must and works the best in my opinion. My fave lashes are in the Natural category in #105 and #117.
Ardell Lashes in #105 & #117


MAC Skinfinish in Candlelight or Soft and Gentle: I love the rosy and peachy gold glow that these particular products give. They look good on EVERY skin tone which makes it perfect for any client that you may have. It goes on smooth and you can place it for a specific highlight or "strobing" look. It also looks gorgeous paired on top of a Liquid Highlight for added glow for Photos.

MAC Skinfinish in By Candlelight

Urban Decay Naked Palette: This was the one that made everyone an addict! Hands down one of the easiest eyeshadow palettes to use for Bridal! It gives you tons of options for Smokey Eyes, Neutral Smokey and Classic Bridal. The shades are beautiful on all skin tones! A mix of semi-matte, sheen and pure shades.

Urban Decay Naked Palette

Giorgio Armani Fluid Sheers: My secret weapon! This product is the most versatile product in my kit. Fluid sheers are a liquid highlighting product. It gives you the ability to add glow as an after effect, tones and colour corrects foundation, allows for a glowy look when mixed into your foundation and is EXCELLENT as an eye primer to make shadows last. It works beautifully with the MAC Skinfinish noted above.

Giorgio Armani Fluid Sheers in #2, #10 and #11


88 Original Coastal Scents Eyeshadow Palette: I love this palette, one of the larger palettes I have! The colours give you a million options especially for dramatic and more creative makeup looks. The colours are very pigmented and last!
88 Original Coastal Scents Eyeshadow Palette


Check out the product links above and see if you want to include at least one into your own personal or professional makeup kit. Be sure to comment below if you have any products that you currently use that you love!


Monday, September 14, 2015

The Many Moods of #Eyeliner | 3 Ways to perfectly shape your eyes!

My Love affair of eye liners started when I was really young! Watching my cousins get ready to go out and seeing how beautiful their eyes looked after they applied liner was like magic for me. I remember back when I first started experimenting with makeup, I started out with eye liner. I wasn't allowed to wear anything else, therefore naturally I became an expert on eye liner, the one thing I could wear.

I played with traditional Kajal from India, to Eye Pencils, Kohl Pencils, Eye Smudgers and Liquid Liners. Some were easy to use, and some took a bit of practice. They all offered very different and unique looks.

Today I wanted to share my top 3 ways of wearing eye liner using 3 different liner products. You will see how each one achieves a very unique look and they all result in beautifully enhanced eyes!

1. Waterline & Mascara
2. Winged Liner
3. Smokey Eyeliner/Shadow Effect

1. Waterline & Mascara 
This is a great look that anyone with any skill level can do. All you need is a good pencil liner that is long wearing. This look is placed in the inner part of the bottom lash line. You can layer the colour back and forth until you achieve the desired darkness of the liner.
Product to use: Kohl or a Kajal Pencil Liner in Black


2. Winged Liner 
One of my FAVOURITE looks to do! A full Liquid liner that "wings" at the end of the eye. The look is bold, unique and fun! You can take your wing as short or as big as you like! This look focuses placement on the top of the eye lid, close to the lash line and then extended outwards and up at the end.
Product to use: Liquid Liner with the Pointed Tip or Fine Brush


3. Smokey Eyeliner/Shadow Effect 
This is more dramatic and a super fun look! You can pair the black liner with any eyeshadow colour, the trick is that you need to use a Waterproof Black pencil and you do the application twice, including the waterline. You line the waterline first and then line the lower lash line as close as possible to the lashes. You start at the outer edge and bring it inwards to the middle of the eye. Take a smudger to "smoke" the rest. Then take your shadow and run it along the entire lower lash line and it will continue to smoke the effect. Add the liner a second time to give drama!
Product to use: Waterproof Eye Pencil and any eyeshadow


Liner can be one of the easiest ways to give your eyes a pop! The products available for liners now come in all forms from Pencils, Gels, Powders to Liquid. Pick the product that feels the easiest and go from there. Have fun and try these out yourself! Be sure to comment or share the post if you like these tips!

TUNE IN this week for my reviews of Eyeliner products that I am loving right now!


Friday, September 4, 2015

Beauty Tip | Changing your hair colour? Use these makeup tips to help your hair look amazing!

Photo Courtesy: Google Images/Rihanna

Have you ever noticed when you change your hair, all of sudden when you put your makeup or your fave lipstick, the makeup doesn't look the same, looks either too dramatic or makes you question your hair change?

A common trend, this time of year, is the seasonal summer to fall transition. It appears in fashion, clothes, makeup and hair. Typically, the hair will be the big change that occurs in terms of colour. Deeper hues and rich tones will take over versus the Summer hues of being sun kissed and golden.

This post, I wanted to share the best makeup tips and tones that you can use when you undertake a drastic hair change. Using these tips, will help your hair transtion pop and will help you see what will look best for which ever hair shade you choose! (Side Note: Other than Platinum blonde, personally I have worn my hair in many different hair tones, so I speak from personal experience that when you change hair and adjust your makeup, it helps you love your hair even more!).

Blondes (White or Platinum Tones)
  • Eyes: Soft Greys + Dark Liner or Soft Browns
  • Cheeks: Soft Pink/Coral Blush
  • Lips: Cool Soft Pinks or Bold Red Lip
  • Celebrity Inspiration:  Gwen Stefani
Photo Courtesy: Google Images/Gwen Stefani

Dark Blonde
  • Eyes: Medium Earthy Brown to Nude Tones
  • Cheeks: Bronze or Brick Toned Blush
  • Lips: Darker Pinky Nudes
  • Celebrity Inspiration: Jennifer Lopez
Photo Courtesy: Google Images/Jennifer Lopez

Brunette
  • Eyes: Light Greys, Browns or Taupe
  • Cheeks: Coral Pinky Blush
  • Lips: Light Mauve or Coral toned lips
  • Celebrity Inspiration: Kate Beckinsale
Photo Courtesy: Google Images/Kate Beckinsale


Red (Mahogany, Black and Beyond)
  • Eyes: Bolder Cooler Shades on eyes. Darker Smudged Liner
  • Cheeks: Cooler Blush mixed with a matte bronzer
  • Lips: Blackcurrant, Deep Burgundy and Magenta Tones
  • Celebrity Inspiration: Rihanna
Photo Courtesy: Google Images/Rihanna
Be sure to have fun and be daring! Once you change your hair, you will feel confident and these tips above can help you transition your hair and makeup to make the perfect statement!


Saturday, July 25, 2015

Product Love | Yves St.Laurent - Full Metal Shadows


Traditional shadows in powder format are great, but Liquid Shadows have been making a big splash this year with Makeup Lovers! They offer ease of use, bold colours and long lasting wear. YSL introduced their liquid shadows called FULL METAL SHADOWS. Let's take a closer look!
 

YSL FULL METAL SHADOWS - SHADES:
  1. Grey Splash
  2. Eau Dargent
  3. Taupe Drop
  4. Onde Sable
  5. Steamy Coral
  6. Pink Cascade
  7. Aquatic Copper
  8. Dewy Gold
  9. Misty Green
  10. Wet Blue
SWATCHES:


SHADE DESCRIPTIONS:
  1. Grey Splash - Silver toned shimmer
  2. Eau Dargent - Pure cool white
  3. Taupe Drop - Gorgeous Taupe shade
  4. Onde Sable - True Gold Toned Shimmer
  5. Steamy Coral - Warm Shimmery Coral
  6. Pink Cascade - Warm Light Pink, perfect paired with gold
  7. Aquatic Copper - Rich Brown Toned Copper
  8. Dewy Gold - Yellow Light Gold
  9. Misty Green - Cool Green Tone
  10. Wet Blue - Silvery Shimmery Bright Blue


The YSL Full Metal Shadows are very shimmery and look amazing on the lids as well as lined underneath the lash line for a pop of colour. Use them alone, or pair them with other tones for a dramatic look. These are great for anyone that needs a quick shadow look in a pinch. They are long lasting, pigmented and give a great metallic look on the eyes!

Be sure to check them out!


Tuesday, June 16, 2015

Beauty Talk | #Contour Mania or Overload? - How to navigate this #1 Trend

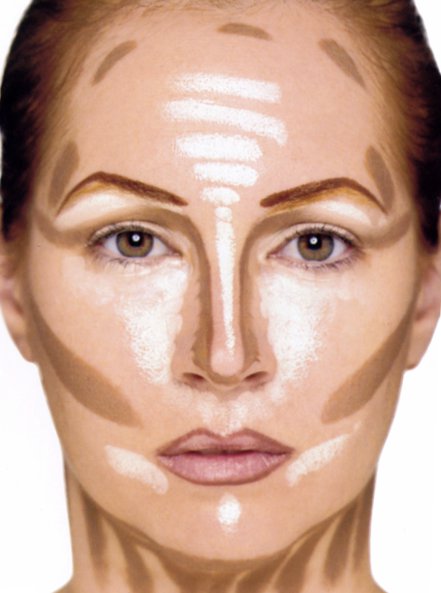
Image/Makeup:  Kevyn Aucoin - The Book "Making Faces".

"This photo is really an illustration of the contours of the face. The application is exaggerated and not to be taken too literally. It's just to show how highlighting and contouring (when sparingly applied and carefully blended) can add definition to the face...You may never do this for everyday life, but for special occasions or photographs, it can really make a difference." 
- KEVYN AUCOIN

We have all seen the countless images of Contouring. The mass number of before and after pics showing the painted makeup 'maps' on faces. Instructions for the proper placement of light and dark makeup to achieve the perfect contour. The faces almost look like a mask of sorts which is now being referred to as a"contour map". Nonetheless, the after photo is always gorgeous, flawless and the makeup looks like perfection.

I have had a lot of my clients and people ask me about this trend. As much as it's popular it has also deterred clients from trying the trend. Especially if you are a person who has never worn makeup or maybe want to see how it's done, the images and videos can be overwhelming.

For this post, I am going to share the types of contouring and my tips of how you can make this trend wearable and simple, whether it's fierce or everyday!

BIRTH OF CONTOURING - Who and where it's used?

  • Photography & Movies | Works well with the Flashing lights of Cameras.
  • Celebrity | Typically seen on Instagram and with their respective Makeup Artists
  • Drag Makeup | Ideal for stage performance to emphasize facial features against the bright lights

Contouring has become extremely popular via Instagram. The trend was really cultivated and developed by many drag performers who understood that to look fierce on stage, they needed to emphasize their makeup.

It works well for Photography because with the extreme flash effects from cameras, a person's face can end up looking too flat or one dimensional. Therefore this makeup technique helped to emphasize and re-create the dark and light areas on a person's face for the best photos.

WHY DO WE NEED TO CONTOUR?

  • To define
  • To accentuate facial structure 
  • To balance light and dark
  • Makeup artist technique which is great for Weddings and Special Occasions

WAYS TO ACHIEVE THE LOOK

Fierce Contour
This effect is achieved with Extreme Highlighting and contouring by using Concealer/Highlighter and Cream Foundation

Time: Half Hour
Best Product To Use: A mix of Liquid Foundation, Cream Concealers, Liquid/Powder Highlighters
Celebrity Inspiration: Kim Kardashian

Image Courtesy: kimkardashian.com


Evening Contour
Medium effect achieved when using a Contour Kit that has all of your go-to shades from light to dark, a blush shade and a highlight shade.

Time: 15 Mins.
Best Product To Use: Contour Kits i.e. Anastasia Beverly Hills or BH Cosmetics
Celebrity Inspiration: Jennifer Lopez

   Image Courtesy: google.com/images

Everyday Contour
Light and wearable version for Daytime. Using the natural bone structure as a guide on placement and then using a soft light Bronzer to define and adding a soft wash of blush on top. The idea is to create the shadow into the hollow of the cheek, which is right under the fullest part of your cheek.

Time: 5 Mins. or less
Best Product To Use: Giorgio Armani Bronzer or Matte Toned Bronzer/Blush
Celebrity Inspiration: Mila Kunis


Image Courtesy: google.com
Hopefully this post and the tips above can help any of those who are trying to figure out how to navigate and use this makeup trend. I do feel that there is so much emphasis on the extreme versions of contouring but it can definitely be achieved with fewer products so it's easy, simple and beautiful. At the end of the day, do whatever works for you, whether it be extreme to light.