Friday, August 2, 2019

Beauty Look | Swatching L'Oreal Paris Colour Riche Matte Lipsticks - Summer Friendly Lips


It's been a minute since I have shared anything on the blog. Lots has been going on personally and therefore I needed to take a much needed break. I'm happy to start sharing things on the blog again :)

So, what better way then to start my return to blogging than to share a beauty look post! In my opinion, one of the easiest ways to change your look is with Lipstick! It's easy, and you can choose how bold you go.

I picked a few of my faves from the L'Oreal Paris Colour Riche Matte Lipsticks! It's a mix of some fun shades that work well seasonally, especially for the Summer!


The lipsticks I chose are:
  1. 711 - At The Drop of a Matte 
  2. 712 - Matte Mandate
  3. 707 - Matte-Jestic
  4. 703 - Matte-Moiselle Pink
  5. 402 - Devil's Matte-Vocate Red


SWATCH PICS:

711 - At The Drop of a Matte - Shade: Bright/Light Purple

712 - Matte Mandate - Shade: Bright Magenta

707 - Matte-Jestic - Shade: Deep Plum

703 - Matte-Moiselle - Shade: Soft Peachy Pink

403 - Devil's Matte-Vocate Red - Shade: Deep Red


These lipsticks are super matte, so if you want a smoother way to apply them, add a bit of Vaseline or Chapstick on your lips before you apply. This will help by making it a smoother application.

Hope you get to try these on for the summer!


Monday, February 11, 2019

Makeup Love | The Wet n Wild #PhotoFocus Foundation - Natural looking foundation for combination skin!


Instagram made me do it! This is the foundation that Instagram beauty influencers told me to buy! Truthfully, I am glad I did!

Through my makeup counter experience, I have been lucky to have had an opportunity to test out a number of makeup from low end to high end brands. What I have learned is that, High end doesn't always mean it's the best for you or that you will even like wearing it.

I always stress that you have to figure out what works for you and what makes you feel your best.

There are 4 things you check off when you look for a foundation:

  1. Coverage and how long it lasts
  2. Texture of Product
  3. The appearance of it on your skin (Skin Tone match and Finish)
  4. Price 
For me, Wet N Wild PhotoFocus Foundation checks off as follows:

  1. Medium Coverage and wears through the day well
  2. Liquid and light weight
  3. Looks like skin and melts into my skintone (Dark Skin Friendly)
  4. Under 10 Bucks (Yep, it's $7.00 from Walmart.ca)


Seriously, you can't get a better foundation at this price! Especially when it checks off in the other categories as well. The foundation is awesome on coverage, finish and price!

I have been using this foundation for a few months now and it's definitely the one I reach for the most. (I have 3 Foundations - For light weight use, Medium coverage and 1 that is party friendly ie. Long wear).

For those who are just looking to have the 1 foundation to use, because they want a simple and easy routine, this a great option as well.

Why it's great:

  • It wears well and you don't need a lot
  • Blends into your skin tone and literally disappears 
  • Comes in a number of different undertones (Warm, Cool and Neutral)
  • A good range of shades for your skin
  • Applies well with Sponge, Brush or Fingers (Clean fingers please)
I picked mine up from Walmart and the shade I got is called 'Desert Beige'. I did my research on a number of Instagram beauty influencers and then opted to buy it. Trust me, you won't be disappointed.

Things to Remember:

  • Always use a little to start and blend
  • Not everyone has to wear their makeup the same way it's shown on Instagram
  • Find the technique or application style that works for you

If you have tried the Wet n Wild #Photofocus foundation, or have picked it up, please leave me your thoughts below! In an upcoming post, I will share a #Makeup look with me wearing this foundation :)


Saturday, February 9, 2019

Food Love | My fast & simple #breakfast recipe (with the ever popular #Greenjuice) !

Thanks for visiting the blog, and yes, it's been awhile and for those stopping in for the first time, thank you so much! Today I'm sharing my quick go-to breakfast that I have been enjoying for some time.

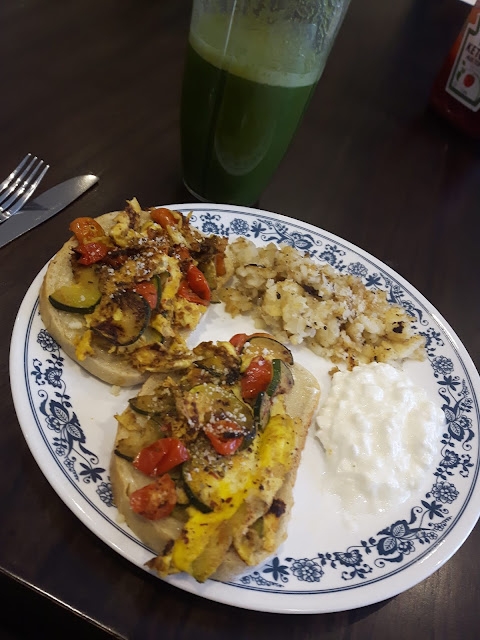
Zucchini  Omelette on Light Rye Toast


Green Juice being mixed in the Ninja Blender


After having my thyroid removed, I learned, that not having this vital organ really affects how the body digests food.

For example, I could eat certain foods and have no issues. Since the surgery, if I have those same foods that never gave me issues before, they wreak havoc on my digestive system. Basically I don't feel well or I just don't enjoy eating them like I used to.

Therefore, for the past number of months, I have started to make adjustments to the recipes that I have enjoyed, which is why I love this breakfast recipe! It's simple and still reminds me of the good breakfasts from the past.

My number 1 priority is two-fold, it needs to taste good and make me feel good. So let's get into this recipe!


ZUCCHINI SCRAMBLED OMELETTE WITH GREEN JUICE
(Green Juice Recipe and pics further below)

Ingredients:

  • 1 Small Zucchini 
  • 1 Egg
  • Cherry Tomatoes (6)
  • 1/2 Tsp. Salt
  • 1/2 Tsp. Onion Powder
  • 1/2 Tsp. Dried Basil
  • 1/2 Tsp. Chilli Flakes
  • 1/2 Tsp. Nutritional Yeast (Optional)
  • 2 Slices Light Rye Bread (Toasted)
  • Cooking oil/Spray of your choice


1. Spray your pan and turn your stove to medium high heat. Then slice your Zucchini into thin slices, and add into the pan. (If you like it chunkier that's up to you) - I find it cooks evenly and faster.

2. As the Zucchini starts to cook, add the following seasonings (Salt, Onion Powder and Dried Basil). Mix it together and ensure your flipping the zucchini so that it's cooking on both sides.

3. Slice your Cherry Tomatoes into halves, and then add into the pan. For about a minute. Turn down your gas to medium heat.

4. Whisk your eggs and pour into the pan, as you would when you make an omelette. Let it stand so that the omelette can form and then gently flip when it's ready. (Here's the thing, the tomatoes and zucchini are "wet" therefore it creates an almost scrambled texture when flipped which is OK!).

5. Once Omelette is ready, remove from heat and turn off the heat. Toast your Light Rye Bread. Once toasted add to your serving plate.

6. Plating: Add your Omelette to your toast. You can serve this with any number of sides from Tots, to Avocado to sausage, that part I will leave up to you. For today, I included some roasted tots and cottage cheese for added protein. Typically I would either have Cottage cheese or Avocado, today is my Saturday version of this breakfast :)

Now onto the Green Juice...


GREEN JUICE

Ingredients:

  • 1/2 Cucumber
  • 1/2 Celery (From the Freezer)
  • Handful of Frozen Spinach (I freeze it myself, makes it last longer)
  • 5 Capful of Lemon Juice OR Squeeze the juice from half a lemon
  • 1 Capful of Apple Cider Vinegar
  • Pinch of Turmeric (Haldi for my fellow Punjabi's)
  • A few slivers of Ginger
  • 4 Small Ice Cubes
  • Water to your discretion or fill line
  • Mixer (One that functions as NutriBullet or a Ninja)

Assembly - The order that works for me:

  1. Roughly Chop your Cucumber and Celery and add to your Cup (I use the bigger one, pics are below)
  2. Add your Spinach, Lemon Juice, Apple Cider Vinegar, Ginger and Turmeric
  3. Add your Ice cubes and Water (You can add more water if needed)
  4. Now blend the crap out of this - I choose Ultra Blend
  5. Taste it to see if you like the texture or if you want it to be more liquid


Tips/Things to Remember:
  • I drink this to get more veggies into my body. I hate eating them raw or don't eat enough. 
  • For me juicing has been super helpful, because it's helped add missing nutrition and allows my body to digest it easily
  • I use Lemon Juice and Apple Cider Vinegar for the savoury taste and their digestive benefits 
  • This juice is NOT a meal replacement - Food is King!
  • Pick things you like and what works for you :)


Enjoy making this and let me know if you have tried it and share your pics via Instagram or in the comments below :)


Tuesday, October 23, 2018

Beauty Look | Soft and Natural Makeup Look via ABH Modern Renaissance Eyeshadow Palette


Here is another makeup look featuring the Anastasia Beverly Hills Modern Renaissance Palette! I'm still in love with this palette!

To be honest, usually the novelty wears off for me, after a few weeks of using a new product. Then I would typically go back to my regular faves, but this one has become a great go-to for me! The shadows work beautifully together or alone and the blendability is awesome! (You don't have to be a makeup artist to get beautifully blended and smoked out eye looks)!

The makeup look I did, was more on the soft and natural side, which was perfect for a summer wedding I went to back in August. I really like how the look came together and that this was a simpler version of a smokey eye.

Product Details are below:


EYES

  • Anastasia Beverley Hills - Modern Renaissance Palette
    • Browbone & Base: Tempera 
    • Transition: Golden Ochre & Buon Fresco
    • Crease/Lash line: Antique Bronze, Cyprus Umber and Red Ochre
  • Waterline: MAC Feline Eye Pencil
  • Top Liner: L'Oreal Liquid Liner
  • Mascara: L'Oreal Voluminous


FACE
  • Foundation: Maybelline FITMe Foundation in Shade 315
  • Blush: Coastal Scents Palette
  • Lipstick: Giorgio Armani - Rouge D'Armani in 500
  • Lip gloss: Fenty Beauty Gloss Bomb

Since this was a summer wedding that was outdoors, I opted not to do a highlight or any shimmer, since my face naturally would produce that glow. Hope you like the look, more to come!


Tuesday, August 21, 2018

Beauty Look | Anastasia Beverly Hills Palette - Cool Mauve #Makeup Look - #ModernRenaissance Eyeshadow Palette


In the past, for me to be able to achieve a cool toned eyeshadow look, on my skin tone was challenging. The reason it would be difficult is that either the shadows weren't pigmented enough or I had to layer a lot of primer/concealer to get the shadows to look right.

Even though at first glance, the Anastasia Beverly Hills Modern Renaissance palette looks like a warmer palette, there are a few colours in the palette, that allowed me to create this cool mauve look.

Check it out below!


Anastasia Beverly Hills Palette & Makeup Used

  • Lid: Tempera
  • Crease: Warm Taupe & Buon Fresco
  • Mid Lid: Buon Fresco
  • Outer Corner: Cyprus Umber
  • Inner to Mid Lid: Vermeer (Mixed with Fluid Sheer #8)
  • Lashline: Buon Fresco & Warm Taupe
  • Outer Corner Lashline: Cyprus Umber
  • Mascara: L'Oreal Voluminous Lash Paradise Mascara
  • Liner: L'Oreal Lineur Intense & MAC Cosmetics Feline Eye Pencil
  • Foundation: Maybelline FitMe Foundation Shade 315
  • Concealer: Maybelline Fit Me Concealer
  • Blush: Fluid Sheer #8
  • Highlight: Fenty Beauty Killawatt Freestyle Highlighter Girl Next Door/Chic Phreak
  • Lips: Maybelline 665 Lust For Blush Matte Lipstick with Fenty Beauty Gloss Bomb


Really like how this look came together! I loved how I could use the duo ended brush that comes with this palette to do all of the eyeshadow application. More looks to come!


Tuesday, August 7, 2018

Product Love | #AnastasiaBeverlyHills Modern Renaissance Palette


Finally!! I have this baby!!

I couldn't wait to get my hands on this Eye shadow palette!  I wanted to see the reviews and makeup looks first before I got it. This is the method I use for my makeup purchases and it's never failed me yet. Once I saw the reviews and the makeup looks, I then headed to Sephora to see the palette in person. As soon as I saw the palette, I was sold!

I have to say, this is my first Anastasia Beverly Hills product purchase, which initially, I thought would have been an eye brow product, since those were the products that put ABH on the map! Bus as ABH started to expand their product offering to other makeup, I was intrigued! 

Without further delay, check out the Modern Renaissance Palette by ABH below:


I really like the mix of matte and shimmer shades in this palette as well as the 2 sided brush, which for me, is a bonus!  Below is my overall impression:


  • Pigmented Colours
  • Minimal Fallout
  • Good blendability
  • Loved the velvety packaging
  • 2 ended Brush is a plus for travelling
  • You can create soft natural looks to super dramatic eye looks


So far this palette is a WIN! To celebrate, I will be sharing a number of makeup looks in the next few days. The looks will be a variety of neutral, soft and super glam looks, which I am excited to share!

Stay tuned!


Sunday, May 27, 2018

Lifestyle | My #ThyroidCancer Story....


I was diagnosed with Thyroid Cancer in April of 2017 and as a result, I took time away from the blog. There may have been a few blog posts I did, here and there, but truthfully, I wasn't able to keep up with the blog as I was feeling overwhelmed with everything.


Now that I am approaching my 1 year scan, I am ready to talk and share in more detail what has happened, how I found out, what prompted me to look for answers on why I wasn't feeling well. I also wanted to share my "in the moment" experience as it was happening to me.


I wanted to:

  • Share things that helped me cope and stay positive
  • Shed light on accurate info about Thyroid Cancer since there are many misconceptions
  • Reinforce that every Cancer story and experience is so personal and unique
  • Provide Thyroid Cancer/Disease awareness 


Therefore, I am scared/excited to share that I have finally recorded and posted my first two videos in a series of videos I will be posting on my YouTube Channel - https://www.youtube.com/user/MakeupbySand


I feel extremely blessed that I am here to share and just felt that it's the right time. Please stay tuned to the blog for updates on the videos that I will be posting on YouTube! I hope you find the time to take a peek. In the meantime, feel free to check out the newly posted videos below:


My Intro Video:


My Real Time Video Pre-Surgery:


If I have learned anything during this experience is that life is short and you must start doing the things you want to do and not wait to live your life. Thanks for reading and stay tuned!!